Wednesday, October 27, 2010

Representational Painting class

To keep with my proposed plan of updating the blog three times a week, here is my Wednesday post. Alex Piccirillo is an art instructor at the Yard School of Art where I work (part of the museum) and has been there since before the museum took it over. He is also a celebrated Master Pastelist and all around amazing individual. You can see some of his work here:http://www.gallery51.org/artists.php?artist_id=59

He's a self-proclaimed student of the Ashcan School, specializing in images of normal, everyday people doing what they do. Having been a trained boxer in his youth, he is also an authority on boxing history and creates powerful images using the subject matter.

Thats the man himself. I mention him because the class I teach was started by and taught by Alex for many years. Throughout the year he's had a series of surgeries to heal an open wound left over from an earlier procedure to remove ankle hardware. Him and I being good friends, he made sure I took over his spot. So without any more yapping, here are some images from last week's class. It was the last night with our lovely model Melinda. Hope you enjoy.


These were some shots of them working in progress. They're a very strong group, many have years of painting experience under their belt while a couple are young aspiring artists. Some take the class because they like making art for fun (don't we all) and it is their hobby, others want to further their skills and pursue it professionally. To those who have never painted or have very minimal painting experience I suggest using the Zorn palette. While it takes a thorough knowledge of color theory and painting in general to master using just the four colors, it eliminates the clutter of having too many colors to choose from forcing them to make calculated decisions about value and tones. Fellow artist and friend Aaron Miller has started a great blog where he posts information on the individual palettes of artists, living and long gone. Here is a link to his post on Zorn, which in turn has more links to info on the artist:
http://oilcolorpalettes.blogspot.com/2010/06/limited-palette-of-anders-zorn.html

And here are their finished images. Colleen did a painting but was away having fun at the Rose Frantzen workshop the previous week, so for her last day with this pose she decided to start a very nicely executed charcoal drawing. Ronnie, always pushing herself, finished her oil portrait and then did a smaller study (which we both decided in the end had more life and character). Unfortunately a few of the students were not available on that day to photograph their finished pieces.

Colleen


Ronnie


Emily


Hana


Jane


Karen


Sylvia

Monday, October 25, 2010

Pan Pastel experiment 1

I'm going to try to update my blog at least three times a week, M-W-F preferably. Sort of following the posting model of Paolo Rivera. This is mainly in my attempt to make this more of a serious art blog with information and what not instead of just personal ramblings. So for today's post I'll give another step by step demo, this time chronicling my first drawing with Pan Pastel. If anyone knows of Brooklyn artist David Jon Kassan you know he uses this stuff quite frequently and is frankly a master of the medium.


Unfortunately I didn't think to make this a step-by-step till about an hour into the drawing, but this is how it looked after the first hour. Excuse the quality as well, the first 3 images were taken with my cell phone. This is done entirely from life with an actual human skull that I borrowed from my job (and have yet to return, hehe) I started it like I would any other drawing; with light, barely visible gestural lines. I then started finding the major dark shapes and blocking them in. Interestingly enough I found that using the pan pastel I can draw similar to the way I paint, which is a nice bonus. The shadow values get massed in with large strokes and then with my kneaded eraser I start finessing the drawing and picking out lights, carving away at the form.


Second go around, this is the drawing after another hour. I'm picking out more lights and little nuances with my eraser, but now I've also started going in with my pencil to get the really fine detail. At this stage I'm rendering cracks and sutures separating the different bones of the skull. Again not as easy to see since its a cell phone pic. I've started working on the teeth as well, getting in the basic overall shapes of the light and dark


This is probably the same stage as before, but I actually took a picture with my camera. I included both because I'm not too sure :)


This is the finished drawing, taken with my camera so you can see some of the detail and rendering. All in all it took about 4 hours to complete, give or take. The process of drawing is similar from start to finish for me. I push and pull the lights and darks. Another important factor in being an artist is that we get to choose what to include and omit. While this is one of the most detailed drawings I have done in a very long time, a big part of that believability is that I didn't show EVERY single piece of information that I saw. There are far too many cracks, holes, stains, and other minutiae on that skull for me to have rendered. The drawing would have lost it's life.

So in closing, I'm very happy with the end result and am proud to include this in my portfolio of grad school images under the life drawing requirements. Wednesday I'll post images from my Representation Painting class, which I teach on Wednesday evenings. Until then, I bid thee adieu and have a great day!

Saturday, October 16, 2010

3 hour study

Hello all. I don't think I've mentioned it before on the blog, but over the summer I undertook a time consuming process to cleanse and sun-thicken my own linseed oil directly from cold pressed, unrefined flax oil. The benefits, you may ask? Well commercially sold linseed oils dry slower than snails crawl, they're chemically refined, and they just don't really compare. The home-made sun-thickened oil I made dries within 30 hours and is completely pure and simply a delight. My step-father has joked countless times that it's "organic" linseed oil, since it is untainted by any alkali and other stuff.

All this is thanks to my friend Louis Velasquez, an art teacher and artist from San Diego, who took it upon himself to find out what the old master's used. He doesn't claim that his medium is THE Old Master's "secret" medium, he can only guess at that himself and as we have both said, they really were just amazingly knowledgeable with their craft. But his research is extensive and has taken up the better part of 10 years or so. And if you look at some of their paintings, in particular the works of Van Eyk, Rembrandt, Rubens, Velazquez, just to name a few, their work show an incredible freshness and preservation considering they're 100s of years old. Rembrandt's in particular look like they just came out of his studio. Bastard!

For my part, I have read a few books specifically on Rembrandt and Velazquez (the two old masters I admire the most) and I can say that Louis's research comes pretty close to what cross-sections of their paint samples show is in their paint. For the most part, oil, calcium, and proteins are the most common ingredients (Rembrandt was ahead of his time in using sand, glass, and God knows what else to achieve his desired effects). Its completely archival and non-detrimental to one's health, as well. Bonus!

So that said, mixing some of the oil with calcium carbonate leads to a thick, viscous medium that when mixed with paints adds transparency to the colors and gives it more body. Oiling out, you take an egg white/oil mixture, called an emulsion, and rub that on the surface and then work into that. NOW... all this is for the sake of permanency and working without any solvents and resins, which in the long run and if in an unventilated room is pretty bad for your health. And as I mentioned, its completely archival.

I've experimented with the medium and emulsion and initially I was not a fan. Particularly of the emulsion. The oil itself is friggin awesome, and those I have given samples to attest to said awesomeness. Having painted for many years using various mixtures of solvents and resins with oils and what not, I became used to the soft, washy effects that I could achieve early on. That was not possible when using this stuff. In effect, I was discouraged. But last night I slowed down and worked a tad more methodically than I'm used to working. But the end result blew my mind. So here is a nice step-by-step progress of last night's painting.

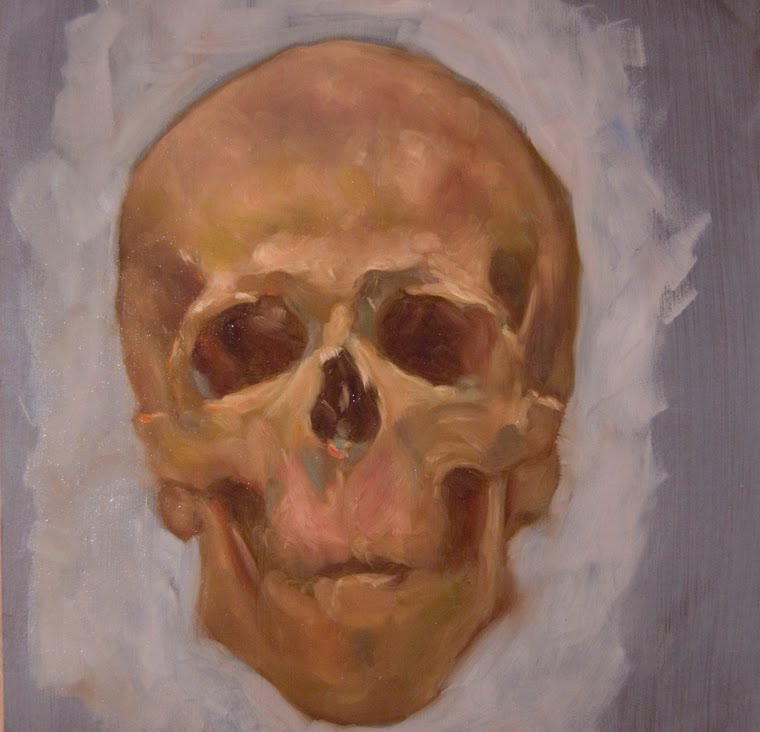
I worked how I normally worked, except I was more careful in my application. My color mixing remained spontaneous so that a lot of random bits of colors and happy accidents still occurred. To those who read my blog and may not be painters, and even for those who are painters and just like seeing how others work:

My palette is arranged as follows: Chinese Vermillion, Cad Red Light (sometimes just Cadmium Red instead of those two), Quinacridone Red, Permanent Rose, Cad Orange, Winsor Yellow, Lemon Yellow, Greenish Yellow, Viridian, Cobalt Blue, Manganese Pthalo Blue, Magenta, Transparent Red Oxide, and a Titanium White/Flake White mixture enhanced with extra Titanium white ground pigment (its a really bright white)

I first lightly drew in the skull with a mix of transparent red oxide and cobalt blue. Once finished, I began blocking in the major shapes of light and dark working from top to bottom. At this point I'm concerned with exaggerating the colors I see so that as I layer over that, it shows thru and enhances the overlaying color. Working slowly and patiently, I study the shapes and redraw as I see fit. I keep the shadows transparent and the lights opaque. The main colors used for the warm light areas are different mixtures of white, cad red light, quinacridone, all the yellows, greenish yellow and magenta. To cool areas down I used manganese pthalo blue and viridian.

The nature of this medium allows for literally glazing wet into wet. So once some of the colors were pretty set, I began glazing warm and cool tones over some areas and worked into those glazes. I just continued pushing and pulling the lights and the darks, the warms and the cools. Certain colors were exaggerated, for instance the blues in the shadow and some of the reddish shadows turning the form. The finishing touches were added by dipping my brush into the emulsion and mixing a puddle of syrupy color on my palette and applying that in thicker, juicier strokes. By the end of the 3 hours, this is the result.
As of this writing, the paint is tacky, but doesn't rub off on the skin if touched.

For anyone who wants to read more about the whole process and if you have questions for my friend Louis, I suggest visiting his website http://www.calcitesunoil.com/ I really can't wait to start working larger with this stuff!